Information
Online Ski Lessons
Online Ski Lessons
(Summarized from “mechanics of sport”)
How to Ski
You can learn how to ski online, even though actually learning to ski needs to be done in real life. This page explains the important techniques and mechanics of skiing, showing how and why they work. When used in conjunction with ski lessons, this can make learning to ski much quicker and more enjoyable.
The page explains why certain things are important, shows common mistakes that people make while learning to ski, and gives a few tips on things that can be tried to achieve the correct techniques.
The theory side of skiing is often overlooked, yet it is very important, and can make a large difference when learning to ski. Many people find that with an understanding of skiing's mechanics, it greatly helps them to improve, and to enjoy skiing even more.
Skiing Lessons
This page is intended to be used in conjunction with ski lessons, and cannot replace a ski instructor.
Performing relevant exercises is a very important step to achieving the correct technique, and is best done in real life with an instructor.
Putting Skis On
As simple as putting skis on is, a lot of beginners really struggle to put on their skis. As with most things though, there are some basic rules that need to be followed, and then everything will be much easier.
Setting Yourself Up
Before you actually try to put your skis on here are some things to check:
• The skis need to be lying across the slope (at a right angle to the fall line). This is so they won't start sliding away as you put them on, and so that once you have the skis on you will be standing sideways and shouldn't slide anywhere. You must be careful to make sure the skis are sideways to the local gradient of the slope, as it only takes a small miscalculation for the skis to start sliding.
• Make sure there is no snow stuck to the bottom of your ski boot, if there is too much snow stuck to the boot, the binding will not close properly. To remove the snow the easiest way is to stamp on the front part of the binding, with the areas under your toes and heels, until the snow has come off. Be aware that this can involve stamping really quite hard. This might make the ski come out of position as well, if it does you need to put it back in the correct position. Also once you have cleared the snow, if you put your foot down on the snow again, more snow can get stuck to the boot, so it is generally best to do this one foot at a time just before you put each ski on.
• Always put on the downhill ski first. To put the ski on, the bottom of the boot needs to be at the same angle as the base of the ski, otherwise the front of the boot will not slide into the binding properly. It can be very difficult to get the boot at the right angle if the uphill ski is put on first.
• If you have poles with you, use them to keep your balance while you are lining your boot up, and removing the snow from the bottom. It is not so easy standing on one leg, on a slippery surface, while wearing strange boots, when you are not used to it.
Obviously the order in which you will need to do these things will need to be mixed, matched and repeated, but if you make sure you follow them you should have no problem when it comes to putting your skis on.
Putting the Skis On
To actually put the boot into the binding, you need to make sure the boot is leant over at the same angle as the ski is, and slide the lip on the front of the boot into the toe cup on the front of the binding. Then line the heel of the boot up with the back of the binding, and bring the heel of the boot down into the heel cup. Once the heel is inside the heel cup, push down on your heel until the heel cup clamps down and the binding lever clicks up. This part is all very simple, the bit that most people have problems with is getting themselves in a position where they can actually put their skis on.
Common Mistakes:
Not putting the skis across the slope properly
Putting the uphill ski on first
Forgetting to reset the back of the binding after a crash
Forgetting to clear the snow from the bottom of the boot
Not keeping the boot flat to the ski
Taking Skis Off
Compared to how complicated it can be to put skis on, this is extremely easy. All you need to do is:
• Make sure you are in a steady position, and will not slide anywhere (generally with the skis across the slope).
• Take a ski pole and push down on the heel lever on the back of the binding, while taking your weight off of the heel of the boot.
• The heel cup with then rotate upwards releasing the heel of the ski boot, so you can take your boot out. Then just repeat the same again with the other ski.
Taking your weight off of the heel of the boot is very important, or you will not be able to release the boot. It does not matter so much which ski you take off first, although it is generally easier to take off the uphill ski then the downhill ski if on a slope.
Common Mistakes:
• Not taking the weight off of the heel
• Not setting yourself up properly, so you start sliding while trying to take the skis off
Carrying Skis
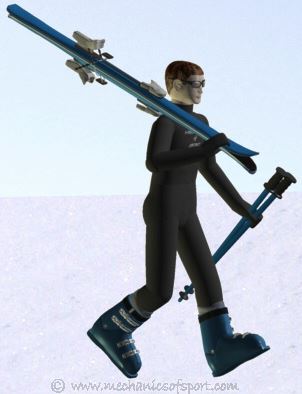
The easiest way to carry skis for any distance is to put the skis on your shoulder and hold them with one hand. To do this, the first thing you need to do is put the skis together.
With the skis standing vertically, hold each ski by the toe housing on the binding. With one ski slightly higher than the other, put the skis base to base, and slide the higher ski down along the other ski until the brakes lock together. Having the skis like this stops them from coming apart so easily, and makes them a lot easier to carry.
Then being careful not to hit anyone or anything with the skis, put the skis on your preferred shoulder, with the area just in front of the bindings resting on your shoulder. When you do this the ski was higher when putting the skis together, needs to be the bottom ski that rests on your shoulder. This will stop the top ski from being able to slide forwards, and make the skis much easier to carry. To hold the skis in position, push down gently towards the ski tips with the hand on the same side as the shoulder the skis are resting on. Now hold your poles in the other hand, and you are ready to carry your skis wherever you need to go.
The Snowplough
The snowplough is where the skis are in a "V" shape. It is a very stable position, which also acts as a brake. Although the snowplough is not used so much once someone can ski well, it is the easiest way to start learning to ski.
The Position
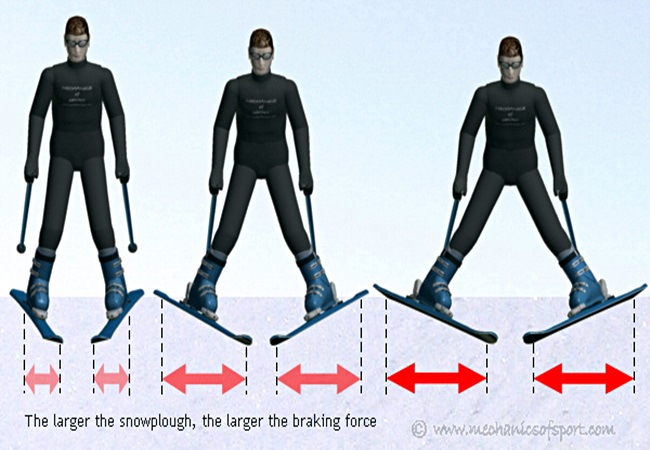
To make a snowplough you put your skis into a V-shape with the ski tips about 10cm apart, and the back of the skis further apart. The ski tips are kept at about 10cm (4") apart because this keeps them close together, but yet far enough apart that the skis won't hit each other or cross over very easily. The distance between the back of the skis changes the angle of the "V" shape the skis make, and how far apart the back of the skis are will vary depending on what you are trying to do.
The snowplough position is very stable because of how far apart your feet are, with the wide stance making it easy to keep your balance at slower speeds. The "V" shape of the skis also acts as a brake, making the snowplough very good for speed control at slower speeds. You may think the snowplough doesn't look like a very natural position, and to be honest it isn't, but it is the position that will give you the most control and stability as you start learning to ski.
How the Snowplough Works
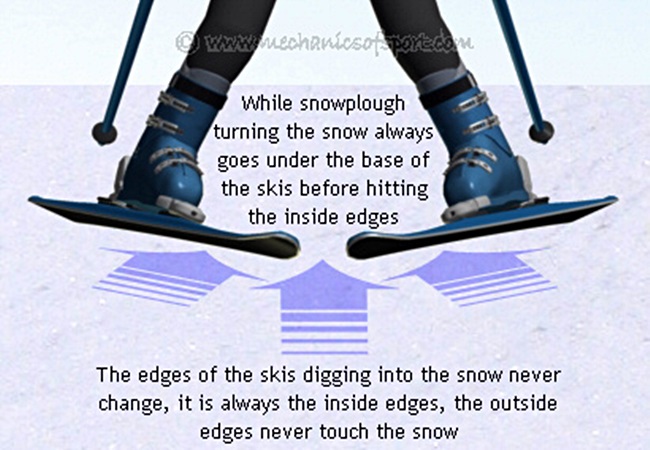
When we look at a snowplough position there are 3 different directions we need to take into account, the direction we want to travel in (straight down the slope), and the direction each of the skis are pointing in. Naturally a ski wants to slide straight along its length, as that is its direction of least resistance. As both skis are pointing across the slope at an angle, as they move down the slope they will both try to travel diagonally across the slope, although each in a different direction. Since we want to slide straight down the slope, it means the skis will have to slide diagonally sideways as they move. When skis move diagonally sideways two things happen, firstly more resistance is created than if the skis were straight, which creates a braking effect, and secondly each ski produces a force sideways (resistance effects).

Speed Control
The snowplough is very good for learning to ski because it is a braking position, and can be used to control your speed. As both skis are traveling diagonally sideways they have more resistance than if the skis were both pointing straight. This makes them act as a brake, and the more the skis travel in a sideways direction (i.e. the wider the snowplough is), the larger the braking force becomes. This means that, assuming you are on a suitable slope, making a narrower snowplough will let you speed up, and making a wider snowplough will slow you down, and can even bring you to a halt. Also, if you use a snowplough of the right width, it will keep you at a constant speed.
Using The Edges
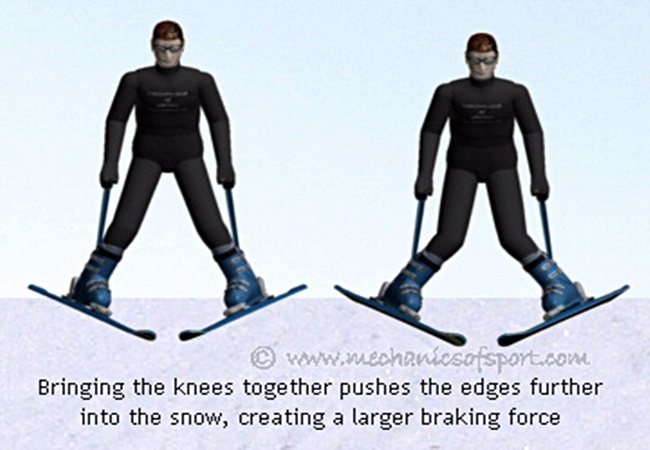
While snowploughing you can also use the angle of the edges to create more or less resistance. If you bring your knees closer together, the skis come onto their sides more, which makes the edges of the skis dig into the snow more (edge pressure). This extra edge pressure also creates a larger braking effect.
In the "walk through explanation" below, bringing the knees closer together and further apart to control your speed, is not included until you want to stop. This is because although it does help with speed control, it is more important to make a bigger or smaller "V" shape with the skis, and this is what should be concentrated on more.
Important Factors
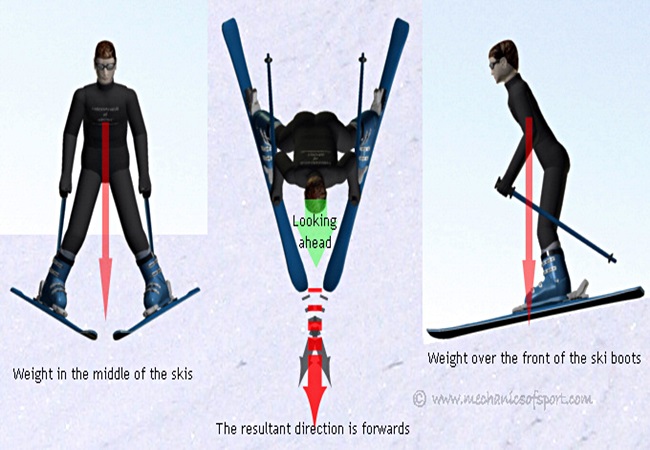
It is important to keep your weight evenly distributed between your skis, otherwise one ski will influence what happens more than the other, and the steady slide straight down the slope will not work as planned. When you snowplough down a slope in real life, the skis will be pushed about by the snow. This will make the skis wobble about a bit, with the tips of the skis getting closer together and further apart, and the angle of each ski constantly changing slightly. The skis will not stay in a perfect "V" shape all the time. This is not a problem however, it's just how the snowplough is in real life. As long as you keep your weight evenly on each ski and over the balls of your feet, while keeping a fairly rigid "V" shape with your legs, any movements and wobbles will correct themselves naturally, without you needing to do anything.
How much resistance you need will depend on the steepness of the slope, and the snow conditions. On a very gentle slope, anything more than a slight snowplough might create so much resistance that you stop sliding. So for your speed control you will have to use variations of a narrow snowplough. Whereas on a steeper slope you may need a larger snowplough to stop you from accelerating, and your speed control will have to use a much wider snowplough.
Walk Through Explanation
Below is an explanation of how to snowplough down a slope while controlling your speed. This is not how a snowplough should be tried on a first attempt, it is a description of how to use all the different parts of a finished snowplough technique.
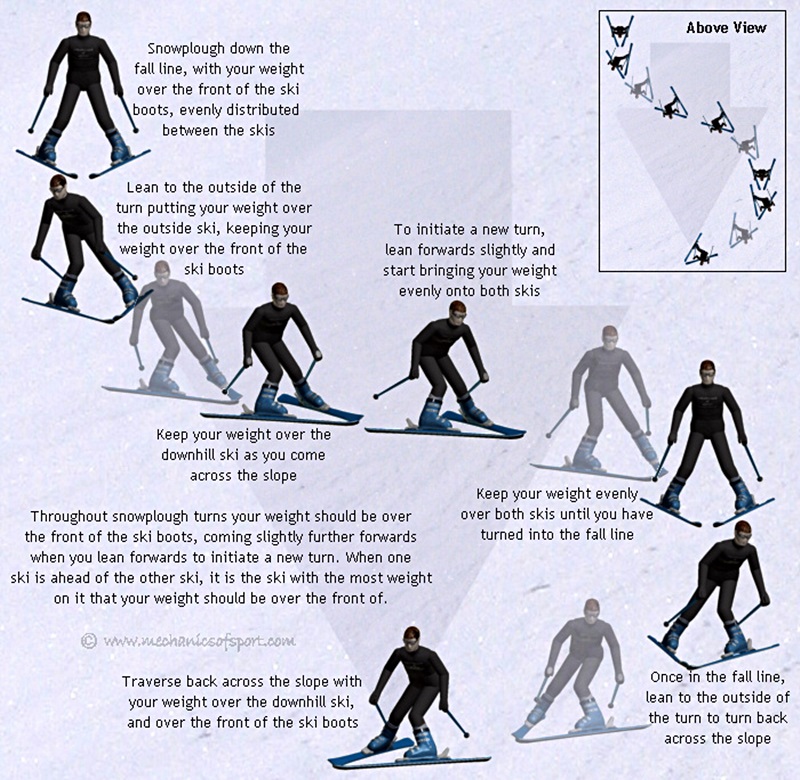
- Setting Yourself Up and Starting to Slide: To start snowploughing it is easiest to start from a position where the skis are already in a snowplough shape with your body pointing straight down the slope. As you bring yourself from pointing across the slope into this position, it is easiest to have your poles pushed into the snow out in front of you, so that you don't slide as you are setting yourself up. Before you start to slide, it is normally best to get your body in the right position, with your weight evenly on both skis, leaning forwards so that you can feel your shins on the ski boots, and with your ski poles out to the side, pointing backwards and out of the way. To get into this position you will need to have made a snowplough with enough resistance to stop yourself sliding when you take your poles out of the snow, which does create one small problem, starting to slide when you actually want to. To start sliding from this static position there are a few things you can do, you can try to shuffle forward by throwing your weight forwards and backwards slightly, being careful not to let your body get out of position as you do it, you can bring your knees a bit further apart so that the edges don't dig into the snow so much, or you can make a smaller snowplough, but this is not easy to do when you are not moving. Most commonly people use a combination of all 3, shuffling forwards while bringing the skis a bit closer together, and trying not pushing too much on the edges.
- Snowploughing Down a Slope: Once we have managed to start sliding, the first thing we are going to do is speed up a little bit. To do this we make a smaller "V" shape with the skis by bringing the back of the skis a bit closer together, while keeping the ski tips about 10cm apart. This decreases the resistance from the skis, and lets ourselves build up a bit more speed and momentum. Once we have a bit more momentum we are going to try to stay at a constant speed for a bit. To do this we make a snowplough big enough to stop ourselves accelerating any further, but not so big that it slows us down. You will have to judge how big this snowplough needs to be, as this will depend a lot on the steepness of the slope and the snow conditions. Once we have a snowplough of the right size we simply stay in the same position, and we should continue travelling down the slope at a constant speed. Next we are going to slow down a bit, to do this we make a larger "V" shape with the skis, by pushing the back of the skis further apart while still keeping the ski tips about 10cm apart. This creates more resistance, and will start to slow us down. Once you have slowed down enough you can repeat what you have just done again, speeding up and slowing down, until you want to stop. You can also try bringing the skis all the way to straight and then back into the snowplough position, if you feel confident enough.
- Stopping: When we are ready to stop, we bring the skis into the largest "V" shape that we can, and then push our knees closer together, so that the edges dig in even more. This creates the maximum resistance possible and should bring you to a stop.
Please note that whatever changes you make while snowploughing won't necessarily have an instant effect, it will take a few seconds to speed up/slow down etc., and a bit of patience is required.
Common Mistakes:
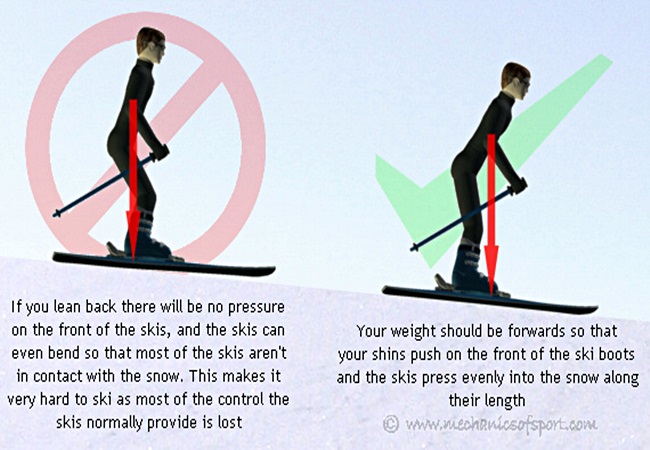
● Leaning back - It is important to make sure you keep your weight in the middle of the skis lengthways. If you lean too far backwards the front of the skis will not push into the snow properly and you will lose the control that front of the skis provided (longitudinal weight distribution).
● Trying to make corrections when bumps in the snow push the skis out of position - Just keeping your weight evenly on both skis and trying to hold your initial position will correct the skis automatically. It just takes a bit of patience.
● Not making a big enough snowplough - To have full control of your speed on some slopes, you really need to be able to make the widest "V" shape possible. If the snowplough doesn't seem to have as much of a braking effect as you want, ask yourself if you are making a large enough snowplough.
● Panicking - If you start going faster than you want to, or start sliding off to one side, panicking about it is the worst thing you can do. When most people panic, they make all the mistakes they don't want to be making, making them lose even more control, and increasing their problems. If you start going too fast or off to one side, try to keep your calm. Make a larger snowplough, keep your weight evenly on both skis and make sure you are leaning forwards gently. This should slow you down and make you slide straight forwards, bringing you back into control.
Tips:
• Until you are more confident with snowploughing, it is always good to practice on a gentle slope with a large flat area at the bottom (or a slight uphill slope at the bottom). This acts as a safety net so that even if you lose control and shoot straight down the slope, you will naturally come to a halt at the bottom without needing to do anything. On a slope like this there should be nothing to worry about as you should always be able to stop safely.
• Be patient, a snowplough is a relatively slow manoeuvre and the changes you make won't have an instant effect. Panicking unnecessarily can really slow down learning to snowplough.
• Taking ski lessons will build your skiing technique step by step through movements that people find easy to make. You will be taken to the right slopes for learning, and use exercises that are optimised for how people find it easiest to learn to ski in real life.
People, who can already ski well, will not use the snowplough so often, but the times when they will use it, will be for speed control when they have limited space around them to manoeuvre. The snowplough is special in this situation, as it enables you to control your speed without moving sideways, which is not possible in more advanced parallel skiing. This means there is always a place for the snowplough, no matter how good a skier is.
Snowplough Turns
Snowplough turns, as described by the name, are turns that are made with the skis in the snowplough position. The mechanics to this turn couldn't be much simpler, although as is often the case, most beginners don't quite find it so easy in practice.
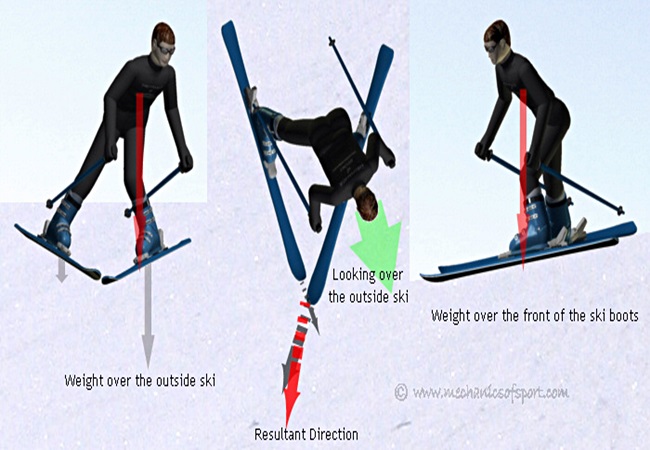
As described in lateral weight distribution the ski with the most weight on it will have the most control over your movement. In the snowplough the skis are in a "V" shape with the right ski wanting to go left (direction of least resistance) and the left ski wanting to go right.
Initiating the Turn
To start a turn all that needs to be done is go from having your weight evenly distributed between the two skis, to putting more weight onto one ski than the other. This makes the ski with more weight on it have more control over your movement than the other ski, and turns your movement more into the direction that that ski wants to travel in as well as letting the ski fall down the slope first.
Although the right ski is on the right side, it is pointing towards the left, and if it falls down the slope first you will be facing left. The same with the left ski but the other way round. Therefore if you transfer more weight to the right ski you will turn left, and if you transfer more weight to the left ski you will turn right. This often catches a lot of people out, how you have to lean right to turn left, and lean left to turn right, but as you can see from the diagram, it's clear why this must be done.
Walk Through Explanation
As that is the physics of making snowplough turns explained. Below is a walk through explanation of how to snowplough down a slope making turns, assuming that we are starting pointing straight down the slope, and that we will turn left for our first turn.
Starting with our weight evenly on both skis, we let ourselves start to slide forwards. Once a bit of speed has built up, we are going to turn left. To do this we lean to the right, bringing our body over the right ski, and putting more weight on the right ski. The harder we lean, the tighter the turn we make will be. Remember that you will turn in the opposite direction to which you have leant. Once we have turned left a bit and are starting to lose some speed, we can adjust the angle that we come across the slope with by taking a bit of weight off the right ski or putting more weight on the ski (although still keeping more weight on the right ski than left). Taking a bit of the weight off of the right ski will make you come into the fall line more, and pick up a bit of speed. Putting more weight on will bring you across the slope more, and slow you down. Then when we want to start the next turn, we bring our weight evenly back to both skis and lean forwards a bit. This makes us fall back into the fall line, so that we are going straight down the slope. As soon as we have got to pointing straight down the slope again, we lean to the left, putting more weight on the left ski. We then start to turn right, and as before when we start to lose a bit of speed we can adjust the angle that we come across the slope with by taking off or adding weight over the left ski. We then start all over again bringing our weight evenly back to both skis and leaning forwards slightly, to initiate the new turn. (Note that leaning forwards is only used to turn into the fall line, once in the fall line it is not needed and the weight should be in the middle of the ski)
Common Mistakes:
• Leaning back - It is important to make sure you keep your weight in the middle of the skis lengthways or the front of the skis will not push into the snow properly and decrease the amount of control you have (longitudinal weight distribution). Leaning back can make the skis turn around, but it will not change the direction you slide in, so that you continue to slide straight down the slope, instead of coming across the slope. For the skis to move you sideways across the slope your weight needs to be further forward, with your shins pushing gently against your ski boots.
• Leaning onto the wrong ski - Before you start to move make sure you realise that you need to lean onto the ski on the outside of the turn. Most people’s natural instinct is to try and lean to the inside of the turn, so as soon as anything unexpected happens or they get a bit frightened they resort back to this, and you need to try and override that.
• Not leaning onto one ski enough - When you put more weight on one ski than the other, you really do need to put more weight on one ski than the other. If you do not move your weight across enough, there will not be much effect from the weight transfer.
• Giving up too early - When you move you weight across to one ski, you will not change direction instantly, you need to have enough patience to keep your weight there until you start to turn.
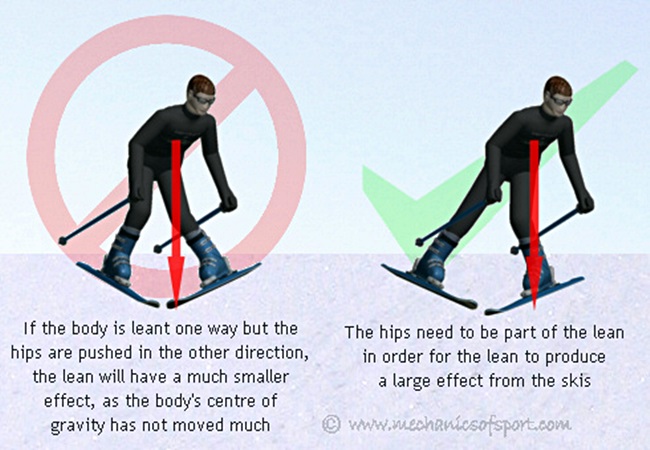
• Moving the hips - The hips need to stay more or less in the middle of the skis, if you move your hips to one side or the other while you make your turns it can have 2 different effects. Firstly it changes the angle that the ski edges dig into the snow at, which can effect how much grip the each ski has during the turn, and secondly, moving the hips can cancel out or decrease the lean made by the upper body. This means that although the upper body is leant over you might find that because of the hips there is no extra weight on the outside ski, stopping the skis from turning around as they should do.
Tips:
• Until you are more confident with snowplough turns, it is always good to practice on a gentle slope with a large flat area at the bottom (or a slight uphill slope at the bottom). This means in the case that you lose control and shoot straight down the slope, you will naturally come to a halt at the bottom without needing to do anything. On a slope like this there should be nothing to worry about as you should always be able to stop safely.
• Taking ski lessons will introduce you to skiing exercises based on how people learn to ski in real life, so that you learn to snowplough turn with the correct technique.
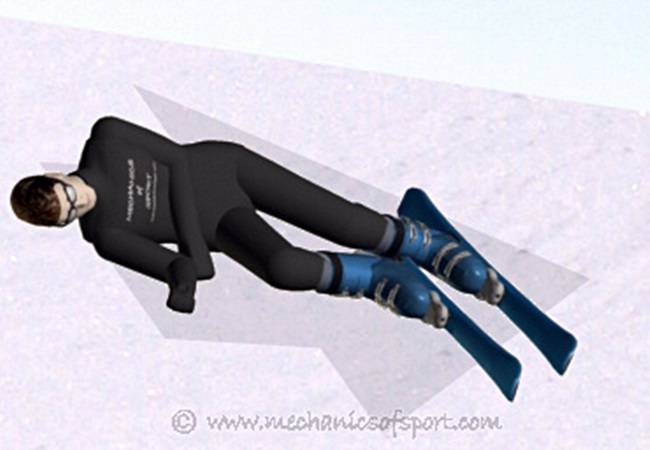
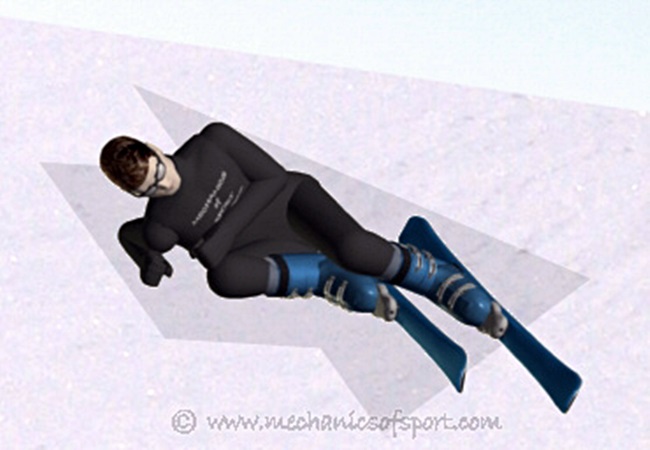
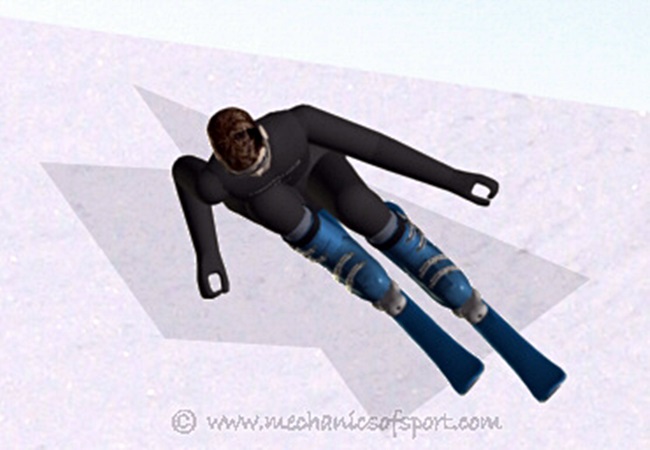
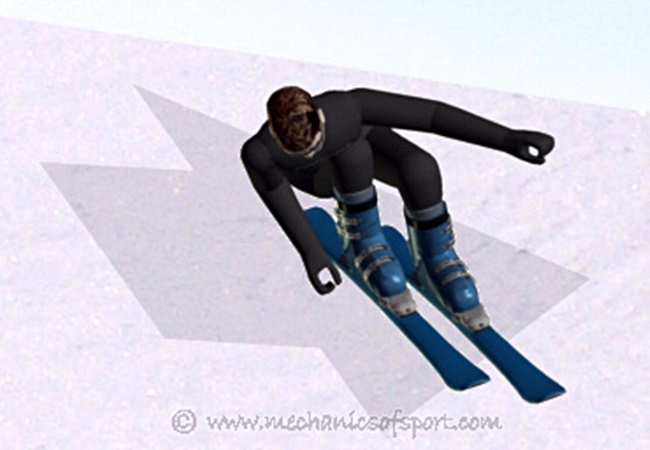
Getting Up
Getting up is something that many beginners find very difficult. The root of this problem is most commonly in the fact that they don't put themselves into the right position before they try to get up.
If you have fallen over, and want to get back up, there are a few stages to getting back upright.
Common Mistakes:
• Not judging the gradient of the slope properly - If you do not have your skis sideways to the local gradient, you will start to slide as you get up. It is important to work out which direction is down the slope where you are, not for the whole slope in general.
• Not bringing the body close enough to the skis - Your body needs to be close to the skis or you will waste your strength pushing yourself across and not up.
• Forgetting to lean forwards - Unless you get your weight over your ski boots you will just fall backwards as you try to get up.
• Running out of extension in your arm, as you are pushing from too far away from the skis.
Ski Lessons
What do you do in Ski Lessons?
Ski lessons will introduce you to the equipment used in skiing, take you to the correct places to learn to ski, and teach you to ski in safety. Ski lessons use lots of different exercises and practices to get you to put your body in the correct positions, and make the correct movements. This website shows you how to ski, but cannot make you ski how a manoeuvre is shown. The kind of exercises done in ski lessons are not shown on this website as they need to be performed with an instructor who can show you the mistakes you are making.
How Long are Ski Lessons?
Ski lessons are generally between 2 and 4 hours long (although not always), 2 hours being a half day and 4 hours being a full day. This may not sound like much, but 4 hours of learning to ski for someone who does not ski often, or has never skied before will normally leave them pretty tired. It is often found that if people do more than 4 hours they just don't have the energy to ski properly any more and their technique suffers.
Types of Ski Lessons
There are generally 2 types of ski lessons, Group Ski Lessons and Private Ski Lessons.
Group Ski Lessons
Group lessons are where you are put into a group of people that are all roughly the same standard, and the instructor will take you through exercises on different slopes to improve everyone's skiing. As you can be in a large group of people with group lessons, the instructor will only be able to pay so much attention to you, and the exercises done will generally have to suit the overall needs of the group. Group lessons can be very good fun though, as being in a group of people can have a very sociable side to it.
Private Ski Lessons
Private lessons are where you have an instructor to yourself (or with the other people you have booked the lesson with). This is the quickest way to learn as you will have all the attention, and all exercise can be suited to exactly what you are doing. Private lessons will work on mistakes as soon as you start to make them, so that it is harder to get into any bad habits.
Between the 2 types of lessons though there can be a large price difference, so although private lessons might be what you would like to have, a lot of people go for group lessons because it fits their budget better.
One last thing to say about ski lessons is that it is always nice to give your instructor a tip at the end, especially if you have learnt a lot. Although your ski lessons may have been quite expensive, it is very unlikely that your instructor will see much of that money, and a tip can often make a big difference to how they get by.
Common Mistakes
When people learn to ski there are many common mistakes that they make, here many of them are listed with reasons why people make them, what happens when you make them, and a bit on what to try to stop yourself making them.
Leaning Back
Leaning back is probably the most common mistake that people make when learning to ski. The reason they lean back is normally very simple, they are afraid of the slope or the speed they have, and the natural reaction is to lean back to try and bring yourself further away from it. Leaning back causes many problems though, as soon as you don't push on the front of the ski boots the pressure on the front of the skis decreases giving you less control.
Not Leaning Far Enough
This is another mistake that is generally caused by fear, in order for manoeuvres to work properly the body's weight really does need to be put into the right position. If the body's weight is not moved far enough the effects that are needed for the manoeuvre will not be strong enough. If you want a quick and distinct effect from you skis, you really need to get your body weight over the right place and not be shy about it.

Moving The Hips
Moving the hips is often a more subconscious mistake, that people don't really realise that they are doing. This falls into the same category as not leaning far enough, as in this case the person does lean further, but they are afraid to put the right amount of weight on the skis, so although the upper body leans considerably in one direction, the hips move out in the other direction, and the overall effect is that the centre of gravity hasn't really moved much. The hips need to be part of the lean to help the body get as far over the outside ski as it needs to be.
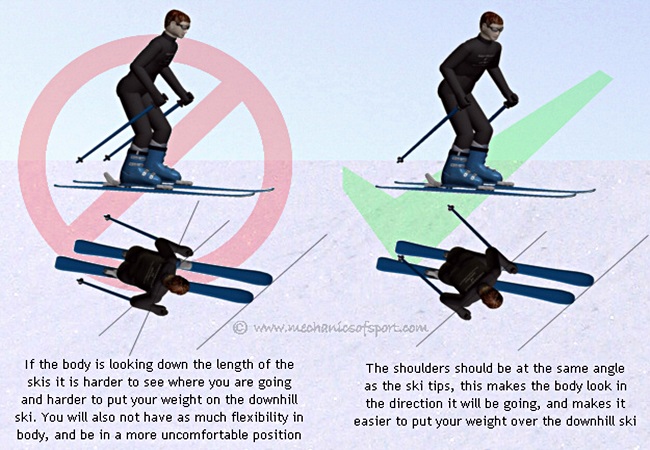
Not Twisting The Body Down The Slope
This is a very common mistake, as most peoples default way of thinking is to think their body should be looking down the skis all the time. The body should be looking over the downhill ski, with the shoulders at the same angle as the tips of the skis. This position makes it easier to lean on the downhill ski, as well as keeping the body in a more flexible position and enabling you to see where you are going better.
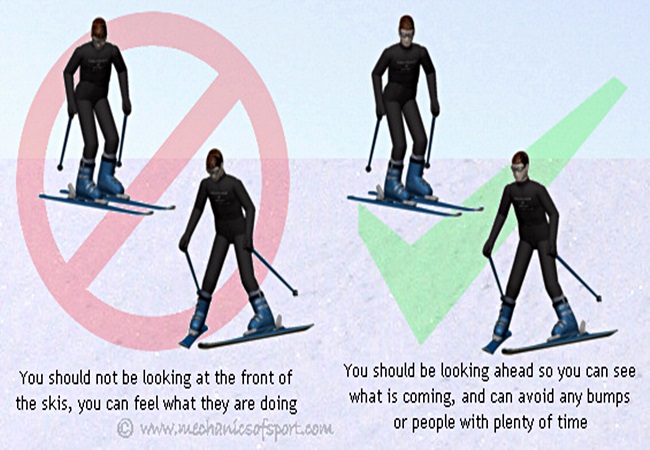
Looking at the Front of the Skis
This is another generally fear based mistake, that stops people from paying so much attention to where they are going, and instead concentrate on something that is not very important. Your attention should be on where you are going and therefore you should have your head up and be looking ahead, as for the front of the skis, you should be able to feel where they are without needing to look at them.
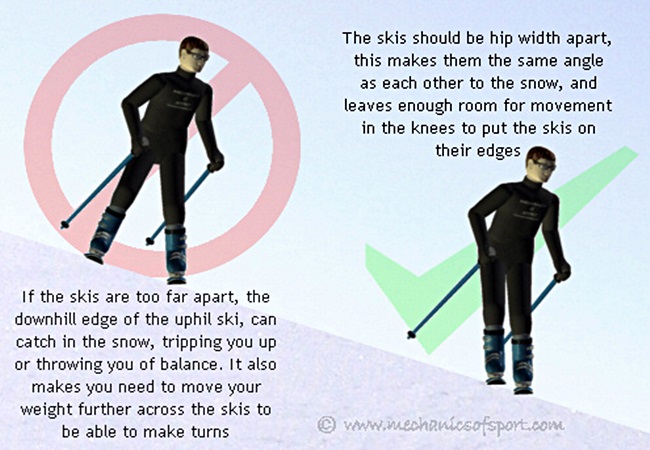
Having the Skis Too Far Apart
The skis should be hip width apart when they are parallel. This ensures that they are both at the same angle to the snow, and also means that the weight changes needed to make turns don't need to be so big. If the skis come too far apart the downhill edge of the inside ski can catch in the snow tripping you up or throwing you off balance. Having the skis hip width apart also leaves enough room to roll the knees so that the skis go onto the edges, which is very important if you want to dig the edges in to slow down, or to start carving.
Not Going Fast Enough
To be able to feel the forces and responses in skiing, you need to be going at the right speed. If you are not going fast enough it will take a lot longer for things to happen, and often they will happen so slowly that they you don't really realise what you did to cause the effect. If you are going at the right speed you should be able to throw you weight around a bit and find out what happens from every movement, feeling the responses of the skis.
Wimping Out
Skiing is a sport where going for it is very important if you want to learn quickly at all, of course what you are going for has to be suitable for your ability, but as long as you take ski lessons this should not be a problem as the instructor will only ask you to do things that you are ready for.
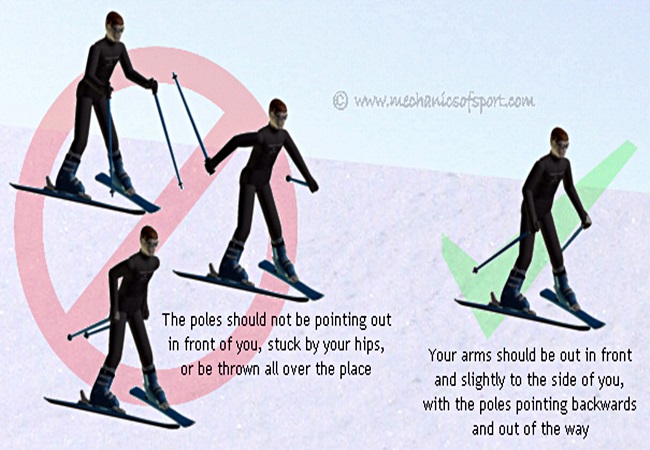
Not Having the Poles in the Right Position
So many people when they learn to ski start off holding the poles in all sorts of different positions which they shouldn't be in. Most commonly either pointing out in front of them, with their hands stuck to their hips or waving them about all over the place. Your arms should be out in front of you, slightly out to the side, with a slight bend in the elbows and the poles pointing diagonally backwards and downwards. The ends of the poles should be far enough above the snow that they shouldn't catch on anything.
Piste Safety
On the piste there are a few rules to be followed that are intended to make the piste a safe and enjoyable place for everyone.
● Respect other skiers and snowboarders - You must make sure that your actions do not endanger or prejudice other piste users.
● Control your speed - You must always make sure that you are in control, and that it is within your ability to handle the conditions, in the space you have.
● Choose your route carefully - The route you take must not endanger the people in front of you. Skiers or snowboarders in front have priority.
● Overtaking - You may overtake on either side, but you must ensure that you have left enough room for whoever you overtake to manoeuvre voluntarily or involuntarily.
● Join pistes carefully - When you join a piste or start from having stopped, you must look up and down the piste and make sure it is clear enough for you to start.
● Stop carefully on the piste - Unless you absolutely must, you should avoid stopping in narrow areas or where the visibility is restricted. When you do stop you should stop at the side of the piste and as out of the way as possible. If you fall over and don't get straight back up, you must come to the side of the piste or out of the way as soon as possible for your safety and that of others.
● Climb and Descend at the sides of the piste when on foot - If you need to walk up or down the piste on foot, you must do so at the side of the piste to stay out or peoples way, and leave everyone in safety.
● Respect for Signs and Markings - You must always obey the signs and markings, as they are there for your safety.
● Help if someone needs assistance - If there has been an accident, help the person and alert the rescue services.
● Witnessing an accident - If you witness an accident, you should leave your name and address with the person taking charge whether you were involved in the accident or not.
Getting On and Off of Chair Lifts
In most ski resorts chair lifts are the most common way for skiers to ascend the mountain to the top of the pistes. A chair lift is basically lots of seats hanging from a cable, which is held in the air by pylons. The cable revolves around a circuit taking the chairs up and back down the mountain. When you sit on a chair lift you keep your skis on your feet, as you are taken up the mountain.
Different Types of Chair Lift
There are several slightly different types of chair lift. Older chair lifts have each chair permanently attached to the cable, making the chairs move at the same speed in all phases of a chair lift journey, whereas newer chair lifts often detach the chair from the cable at the top and bottom so that the chair can be slowed down to make getting on and off easier, as well as enable the chair to travel faster as it goes up the slope. Some older chair lifts use a conveyor belt as you get on the lift, enabling the lift to travel a bit faster. Chair lifts also vary in the number of seats they have, with most chair lifts normally having between 2 and 8 seats. The last major difference there can be is the type of safety bar they have. Most safety bars are pulled down from above, but on some 2 seater chair lifts they swing around from the side. Normally safety bars also have ski rests attached to them, so that you don't have to leave your legs hanging, although in rare cases they don't. Some newer chair lifts also have new added comfort features like heated seats, and clear plastic bubbles that can be pulled down to protect you from the wind and snow. This article is based on the most common type of chair lift, with a safety bar that you pull down from above.
Getting On a Chair Lift
As you approach a chair lift there is normally some kind of queuing system, enter the queue if there is one and patiently move with the queue towards the chair lift. As you are queuing take the pole straps off of your wrists. You will come to a set of gates, the gates open and close automatically, to let people through at the right time to get on the chair lift. When a gate opens only one person should go through each gate slot. As soon as the gates open, shuffle yourself through the gate and continue going forward until you get to the line that shows where your ski tips should be. Don't take too long to do this, as the gate will only stay open so long, and you only have so much time to get into position before the chair lift will arrive. Once you are on the line waiting for the chair to arrive, hold both your poles in one hand, and look over your shoulder to see the chair arriving. If it is an old lift, you might also want to put one hand out to stop the seat from hitting you in the legs too hard. As soon as the chair reaches you, sit down on it, lift your skis up gently, and let your skis slide off of the end of the platform. As soon as you are clear of the platform, pull the safety bar down, making sure that everyone on the lift is clear of it first, and rest your skis on the ski rest.
While On a Chair Lift
While you are on a chair lift simply sit back and enjoy the views while holding your poles in one hand, and resting your skis on the ski rest. If you are on a modern chair lift with a bubble and it is windy or snowing you can pull the bubble down over your head to keep warmer.
Getting Off of a Chair Lift
As you approach the top station you will need to prepare to get off of the chair lift. As you get to within 20 seconds or so of the station, take your skis off of the rest, and let them hang underneath you. Then just as you are coming into the station lift the safety bar up, making sure that everyone else on the chair lift is ready and have taken their skis off of the rest too. In the last few years a lot of chair lifts have had a sign installed to show you where you should lift up the safety bar. Once the safety bar is up you will be entering the top station. If you are on a newer chair lift, the chair will generally slow down here so you have plenty of time to get off, however if you are on an older chair lift, it probably won't slow down as you come into the station, so you will have to be a little bit quicker. As the chair lift arrives at the station make sure you keep your ski tips up, so that they cannot catch on the platform, which would generally pull you off of the chair lift. Chair lifts normally have 2 stages to the top area, a flat area of snow, for you to put your skis down on and get your balance, and a gently inclined area, for you to slide down and get away from the chair lift
As you as you reach the flat area, put both skis on the ground and ready yourself to stand up, still holding both poles in one hand. As you reach the sloped area, stand up and gently push yourself away from the chair lift with your free hand. Then slide away from the chair lift, still with both poles in one hand. Once you have slid away from the chair lift initially make sure you continue to move away from the lift, as more people will be coming and there needs to be space for them to slide away from the lift too. Once you are far enough away from the lift, you can then put you pole straps back on your wrists, and ready yourself to ski off.
If you fall over as you get off of a chair lift, if possible try to either get up quickly and continue forwards getting out of the way, or try to shuffle sideways out of the way of the next people who will come off of the chair lift. Chair lift operators are normally very good and will quickly stop a lift if someone has fallen over in the way, so that people don't ski into them. But they cannot always spot everything, and if they do stop the lift, you are delaying everyone else from getting up the mountain.
Common Mistakes:
As simple as getting on and off of a chair lift should be there are many mistakes that people make, even people who have been skiing for years.
● Not moving through the lift gate as soon as it opens - You only have so much time to get into position once the lift gate opens, and on some lifts if you don't move through quickly, you will struggle to get to the line and prepare yourself before the lift comes.
● Moving out of line after you have gone through the lift gates - Lift gates are normally set up inline with where the seat for you will arrive, but if you veer off to the left or right after going through the gate, you can miss your intended seat and even push people off of the sides as the lift arrives.
● Not looking out for the lift as if comes from behind you - Older lifts especially can approach quite quickly, and if you are not looking out and ready they can hit you in the back of the legs quite hard.
● Not taking the pole straps off of your wrists before you move through the gates - As soon as you have sat down if not before, you want to have your poles in one hand. This leaves you a hand free to pull down the safety bar, and to push yourself off at the top. If you still have the straps on your wrists, they are likely to get in the way of the safety bar, and you might even stab people with them if you try and pull the bar down, or move your hands around.
● Not checking that everyone is clear before pulling the safety bar down - Sometimes people will start to adjust their boots and so on as they get on a lift, and if you pull the bar down you can squash them under it. It's not always possible to see where everyone is, so check quickly and pull the safety bar down slowly and gently, so that you notice if someone is in the way without hitting them with the bar too hard.
● Not holding onto things while you are on a lift - As stupid as this might sound, you would be amazed at the amount of things people accidentally drop off of chair lifts. Once dropped most things are normally very hard to get back as well.
● Forgetting to take your skis off of the ski rest before trying to lift the safety bar up - The bar will not come up unless you have taken your skis off of the rest first.
● Not checking if everyone else has taken their skis off of the ski rest before trying to lift the safety bar up - The bar will either not move or you will lift their legs and skis in the air.
● Trying to use your poles to get off of the lift - Two things can happen if you do this, one you can put your poles in front of other peoples skis, so that they cannot slide away from the lift, and effectively get dragged under it, falling over. Or you put your pole into the snow before the instant you want to move off, which gets the tip stuck, and the chair continuing to move forward either bends or snaps your pole. You should hold your poles in on hand and not try to use them until you are away from the lift.
● Not moving out of the way at the top of the lift - Where you stop sliding is also exactly where the next person is going to stop sliding too. You need to make sure you continue to move out of the way, or they might well crash into you as they have nowhere else they can go.
● Falling over as you get off the chair lift and just lying there - If you fall over, try to get up quickly or get out the way. There will be more people coming in just a few seconds, and you don't want them to either crash into you, or the lift to stop delaying everyone else.
Even though there are many common mistakes made on chair lifts, getting on and off of chair lifts is actually very easy and simple. Here are some tips to make everything easier.
Chair Lift Tips:
● Take your poles straps off of your wrists before you get to the gates.
● As soon as the gate opens move forward to the line and watch out for the chair lift, without veering out of line.
● Check that everyone is ready before you pull the safety bar down.
● Hold onto your poles in one hand while on the lift, and make sure you don't drop anything.
● Make sure everyone has taken their skis off of the rest, before pushing the safety bar up.
● Push yourself away from the chair lift, with your free hand as soon as you get to the inclined area at the top, while holding both of your poles in the other hand.
● Continue to move out of the way once you are off of the lift, so that the next people don't crash into you.
Summarized from “mechanicsofsport.com”
-

-
KOREA SKI TOUR's SNS StoryNotice & News
Tour information for Co... 2020.12.12 -
Customer Center+82-2-738-1170Business Time / (Korea Local) : 08:00am ~ 06:30pm
Tel : +82-2-738-1170
https://www.skitourkorea.com
Credit Cards Payment
KOREA SKI TOUR | Business License No : 101-86-75773
Online Marketing Business No : 2013-Seoul Jongno-0150 | Tourism Business Certificate of Registration : No.2012-000030 / Business Insurance No. 01-12-1552
CEO : Mr. Joo, Gil-woong | Address : #601-16, 47 Sejong-daero 23-gil, Jongno-gu, Seoul, Korea
TEL : +82-2-738-1170 | E-MAIL : seoulntour@gmail.com
Copyright ⓒ . SEOULNTOUR Co., Ltd. All rights reserved.